How to convert your Windows 10 v1703 (or later) to rapid and secure UEFI booting
If you upgraded your computer from a previous version of Windows, or never enabled Secure Booting when you initially installed Windows 10, this guide might be for you.
Why would you want to do this?
When you start your computer a system called the BIOS starts the computer, checks hardware and handles the starting of your (booting) operating system. The old ‘legacy’ BIOS has been in place for decades and in the late 2000s began to be replaced by the UEFI system. Later on the Secure Booting feature was added to the UEFI stack. There are additional security features enabled with Windows 10 when you enable UEFI booting. These security features are desirable and help protect your computer from some basic attacks, but the major feature that most would be interested in is a quicker computer startup. UEFI booting typically starts the computer much more quickly than using the old method. In fact OS/X has been using UEFI booting methods for longer than has been default with Windows, and you can even enable UEFI secure booting with Linux distributions such as Ubuntu.
For now we will be concentrating on converting an existing Windows 10 v1703 (Creators update) or later to UEFI.
You will need:
- An internet connection
- A USB stick/Thumb Drive/Jump Drive (all the same thing)
- A computer that supports UEFI (generally manufactured around 2012 or later) that you have upgraded to Windows 10 from any other version of Windows
Steps to check if you can do this:
- First we need to check the version of the OS that you have installed a compatible version of Windows 10. Any new version of Windows 10 that was released to the public in 2017 would work, so for example the Creators update v1703, the Fall Creators update v1709, or a later version according to this website.
- Click Start
- Type ‘System’
- Start ‘System Information’
- Under the may System Summary page, find the second entry called ‘Version’
- If the number after Build is one of the following you have a version that you can use:
- Build 15063 – Windows 10 Version 1703 (Creators Update)
- Build 16299 – Windows 10 Version 1709 (Fall Creators Update)
- Build 17025 – Windows 10 Version 1803, OR LATER VERSIONS
- Note the version of Windows that you have installed
- If you have an earlier version of Windows 10, search Google for ‘Windows 10 Media Creation Tool’ from the Microsoft website, download it, run it, and choose upgrade this PC. This should get you to the latest version.
- Next we would need to check to see how you are booting and since we already have System Information open, you can:
- Note the version of your BIOS under the ‘BIOS Version/Date’
- You will want to go to the PC Manufacturer, motherboard manufacturer, or Laptop manufacturer and make sure you have the latest version of the bios. If not you should update it now (not covered here).
- Make sure that under the field ‘BIOS Mode’ it says Legacy, if it says UEFI, than you do not need to continue to convert your disk, you may want to make sure that you have secure booting enabled though.
- Note the ‘System Type’ either x86 or x64-based PC
- Next we can start doing some of the checks on the Microsoft Docs how to website listed here, by checking your hard disk:
- Right click on the Start button and select ‘Disk Management’
- When it opens find the Disk that has the C: NTFS Windows partition and Right Click on the Disk tile on the leftmost side as shown in the red area below:
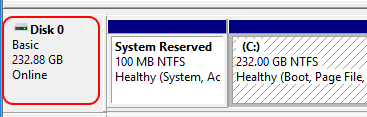

- Select Properties
- Go to Volume Tab
- Verify that the Partition Style says ‘Master Boot Record (MBR)’
- Verify that there are only three or less partitions (boxes) to the right of the Disk tile. If there is more than three, you will not be able to convert your disk.
- We now need to make the final check, to see if you have a compatible UEFI bootable computer.
- Reboot your PC, but pay careful attention to what flashes on the screen
- You will see something like F12 for setup options, or DEL for BIOS Settings. Generally any word with Setup should lead you to the BIOS
- You will need to repeatedly hit that key as soon as it appears as it is only enabled for a second or two, don’t worry if you miss it, you can reboot again
- Once you are in the BIOS settings, look for the word UEFI anywhere. It may be in the Boot settings, or Boot options. If you do not see an option for UEFI than likely you do not have a compatible computer. You can also look in your computer/motherboard manual index to see if UEFI is allowed.
- Make note of where it allows you to switch to UEFI booting mode, there should also be an option to select secure booting. Consult your computer/motherboard/laptop manual or support to see how to do this.
Make a Bootable Windows PE USB stick:
You will need a USB Stick that can boot into a Windows environment in order to run the converter.
- Obtain an empty USB Stick, if there are files on the stick they will be overwritten so make sure to backup whatever you have on the stick if you want to keep it. You can reformat the drive once you are done with this tutorial and have enabled the UEFI on the computer(s) that you need to enable it on.
- Google ‘Windows Assessment and Deployment Kit (Windows ADK)’ to find the Microsoft site that has the software that you need to create the bootable USB stick.
- Find the version of the file that you need to download, they are listed by Windows 10 Version numbers that you noted earlier above. It should download a file named adksetup.exe
- Deployment Tools, and
- Windows Preinstallation Environment
- Once installed find the ‘Deployment and Imaging Tools’ item in the Start menu. Start it.
- Once it’s started, you will be presented with a command line (CMD.exe) like environment.
- On the task bar, right click the icon it started shown below:

- Select ‘Pin to Taskbar’
- Close the Tool, the icon should remain
- Now Right Click on the taskbar icon and then
- Right click on Deployment and Imaging Tools Environment, and
- Select ‘Run as administrator’, then YES to allow making changes to the computer
- You will be presented with the same window as before, but it will say Administrator at the top left
- Insert your blank USB Stick, and note the drive letter that it obtains, if it is not formatted, open windows explorer and format it.
- Select the Development and Imaging Tools Window and type in the following command. Replace the amd64 with x86 as noted earlier from System Type. Hit enter after typing in the correct command.
Copype amd64 C:\WinPE_amd64
- Once that is copied type in, again replacing the amd64 with x86 as noted. Also, replace the F: with the drive letter that your USB Stick obtains, e.g. J:, E:, D:, etc. Hit enter after.
MakeWinPEMedia /UFD C:\WinPE_amd64 F:
- You will get a prompt to make sure that you want to erase the drive, select yes, by hitting y and enter if necessary.
Converting your PC to UEFI:
You could watch the video contained on this Microsoft Docs Page, if necessary.
- Now you are ready to reboot your computer, save and close any windows you need, and select reboot. As before you need to pay attention to the prompts that come on the screen when you boot the computer.
- Select the boot special device if that option appears, and select boot from the USB drive.
- You will see windows 10 boot with normal icons but instead you will be presented with a blue background, and another CMD.exe type Command Window.
- The first thing that will run will be wpeinit. Wait until it has finished running and presents you with a prompt.
- Type in the following command and hit enter:
mbr2gpt /validate
- If you see ‘Validation completed successfully’
- If the drive is already GPT it will report an error. Also, if your drives are in RAID, you may need to load the raid driver with (replace the drive letter with whichever drive letter WinPE loads with):
drvload d:\path_to_folder\driver.inf
If that does not work there is a mbr2gpt option /allowFullOS which would allow you to run these commands from within Windows while it is running on the drive it is running on, but, YOU SHOULD NOT DO THIS UNLESS YOU UNDERSTAND WHAT YOU ARE DOING, OR HAVE A FULL BACKUP. You could nuke your drive irrevocably. - After successful validation, type in the following command:
mbr2gpt /convert
- You should get a bunch of messages, ending with ‘Before the new system can boot properly you need to switch the firmware to boot to UEFI mode!’
- As the suggestion says, you can now reboot your computer.
- Once back in your BIOS make sure to change booting to UEFI Mode
- You should set the boot menu to UEFI only, Secure Boot options
- In earlier BIOS version that only support UEFI (version 1.0) and not Secure Boot, you may need to specify the boot file, such as in Dell laptops. In that case, find the boot directory first and the .efi boot file located within it, then label the boot option, and reboot.
- If your computer restarts into Windows 10, you are done! If not, you may want to troubleshoot the BIOS boot options first.
- Do not worry, all your data is still there if there is some catastrophic error.
- You can return to System Information and Disk Management, as before, and verify that the BIOS mode is UEFI, and the disk is now GPT respectively as instructed earlier.
Enjoy your quick booting secure PC!


Comments
Post a Comment