How to block adware and malicious websites on your PC or Mac using a hosts file
BACKGROUND
Are you tired of having many ads blasted to you when you open your browser? Are you concerned what the advertisers and analytics are doing with your data? Would you like to block ads but do not want to sign up for a subscription to ad blocking software?
If the answer was yes to any of those questions than you have come to the right place. In this guide, I will show you how to do this with a hosts file. If you do not want to read all about how this works and why just skip to the how to steps. PLEASE NOTE, you cannot accomplish the end goal if you do not have administrator control over your PC. If you are trying to do this on a work PC for example, you are probably better off with website level blocking.
HOW THIS WORKS AND WHY
What is a host file you ask, and why is it important? A hosts file is something that virtually every computing device with an operating system that uses standard internet protocols since about the 60’s when ARPANet was a thing.
A little history, ARPANet the precursor to the internet was created by ARPA or Advanced Research Project Agency back in the late 60s and early 70s. ARPA being the precursor to DARPA or Defence Advanced Research Project Agency which is the US Military’s science based program agency to develop new weapons technologies. ARPANet was initially created as a means for scientists to share technologies through nodes which were either universities, or defense contracting agencies. It was later made into the more familiar networked environment as a way to enhance command and control (C2) functionality through a Nuclear strike. J. C. R. Licklider was the ARPA director that invented the concept of the internet and worryingly so also envisioned a future where the government could use this information to predict when ‘enemies’ were going to attack.
With ARPANet you also had the invention of TCP/IP which remains the protocol (or network language) that computing devices use to talk to one another. With each device, it must have a TCP/IP address when it is on the internet. This is where we can insert our ‘blocking features’.
If you are old enough to remember setting up a computer with an internet service like you would have to in the early 2000s you would know that you would almost always have to specify a DNS (Domain Name Service) address for which your computer would query to figure out what IP address relates to the www address or hostname you are typing. Each hostname will have an equivalent IP address associated e.g. if you ping www.microsoft.com you might see an address 24.34.196.221. The IP addresses can change or route to a different hostname if for example the web serving company changes. The DNS server that you use with every computing device will store the lists of hostnames vs IP addresses and help your device retrieve the internet data that you need. All traffic must filter through a DNS server in most cases. In some cases, the IP addresses do not change but for the most part and for our purposes we can consider that all the traffic we want to deal with will need to pass through this type of filter.
So back with ARPANet you would have to have a file on every computer called a hosts file in place of the DNS server. If someone added a new computer to the internet you would need to update your hosts file and make sure it would route to the proper location. Now almost no one uses this hosts file functionality the way it was originally envisioned, but some programs and companies still use it for making custom routes on company devices or to make sure that certain internal network services are blocked like Web Proxy Auto Discovery Protocol.
Every PC and Mac operating system or OS has a hosts file – Windows, OS/X, Linux, Unix, Android, iOS, etc. And this is a good thing for us because we can use this functionality to tell hosts that we do not want to see to not retrieve any information.
While the format of the hosts file on the three different main OSes is slightly different, it is mostly conceptually the same (placement of spaces, or replacement of spaces for tabs, text file encoding etc.). In a hosts file you normally have a list containing IP addresses next to website addresses or hostnames.
See an example below:
192.168.2.1 www.mywebserver.com
If that line was in your hosts file, every time in your browser you went to www.mywebserver.com it would query the machine with the IP address at 192.168.2.1 thereby sending a signal across whatever network you were currently on.
There are one of two addresses that we will be placing in our hosts file to do the blocking. These two addresses are the same for every system since they are part of the IPV4 standard designated as Special Addresses:
127.0.0.1 – The loopback IP address, which routes to the machine that made the request
0.0.0.0 – A place holder meaning no address, which also routes to the machine that made the request
Basically if you go to either of these addresses you are telling whatever software to look for it on your device. The difference between the two is the time in which the request has to fail. The 127 address will have to wait for a timeout, so for our purposes we will by default use 0.0.0.0 to tell the computer that this address does not exist.
In our hosts file we will have a list of addresses that we will be blocking, and effectively on these devices we will be telling the device that the web servers do not exist and therefore to not send any traffic over the network. For example:
If you had one of the above two lines in your hosts file you would not be able to reach Microsoft’s website, nor would any service on your device be able to reach it either. In a web browser you would get something like a 404 or a blank page.
ALTERNATE METHODS TO BLOCK
There are alternate methods using hosts file like setups, I have in my blog a guide on how to do this on an Android device here.
If you just want to enable blocking on your local network only you can use something like a Squid proxy server, it’s open source software and free to use. Some Network Attached Storage Devices have this pre-installed. Also, while you are at it you could also setup CLAMAV for Squid, and scan network traffic for malware and viruses as a bonus. These are beyond the scope of this discussion.
There are also a lot of other website level blockers that you can use, some where you can whitelist certain channels, but for the most part these addons will chew up extra CPU cycles. Some examples of website addon blockers are Ublock Origin and No-Script.
STEPS TO BLOCK ADWARE AND MALWARE WEBSITES ON YOUR PC - CREATE THE LIST TO BLOCK
- The first step is to make a note of which operating system you are using. In the steps below I will show steps for either MacOS, Windows, or Linux (in Ubuntu flavor).
- Head on over to the following website and grab the latest list of ad web servers
- In the ‘list ad server hostnames’ section with ‘Choose Format’ select ‘hosts – in hosts file format’
- If you have a Mac DO NOT select the Mac version that is for the ancient Macs that likely you are not using
- You can either select with or without links, it really doesn’t matter
- Click the ‘go’ button in the ‘list ad server hostnames’
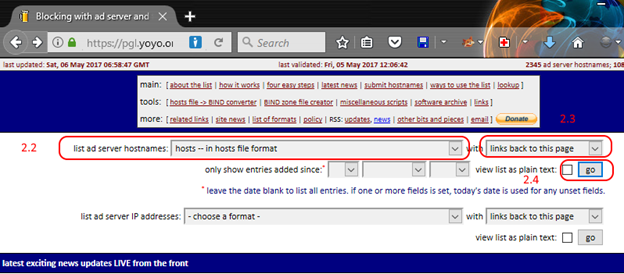
- On the next page you will see the full list, but we need to make a change. Change the IP address used as shown below to 0.0.0.0 and click ‘show list with this IP address’.

- Select the entire list starting below where you just clicked to change the IP address and:
ON Windows:
- Press CTRL and C to copy the website contents
- Open Notepad by pressing the Windows Key and R, then type in notepad and hit enter.
- Paste everything into the empty Notepad Window by pressing CTRL and V when inside the Notepad Window.
ON macOS:
- Press ⌘ and C to copy the website contents
- Open TextEdit by clicking on spotlight search (shown below) and type TextEdit and hit enter.

- Paste everything into the empty TextEdit Window by pressing ⌘ and V when inside the TextEdit Window.
ON Linux (Ubuntu):
- Press CTRL and C to copy the website contents
- Open your favorite flavor of text editor (we will use gedit for example) by Pressing the ALT + F2, then type in gedit and select the Text Editor gedit application.
- Paste everything into the empty gedit Window by pressing CTRL and V when inside the gedit Window.
- You will probably also want to make sure google analytics is blocked as well as Microsoft analytics.
Google Analytics:
- Copy the following text below to block Google Analytics:
0.0.0.0 www.google-analytics.com
0.0.0.0 google-analytics.com
0.0.0.0 ssl.google-analytics.com
|
ON Windows:
- Press CTRL and C to copy the above addresses
- Go to your previously open Notepad window and scroll to the bottom and put the cursor on the last row and create a new line by hitting enter
- Paste everything below the last entry by pressing CTRL and V when inside the Notepad Window on the last line.
ON macOS:
- Press ⌘ and C to copy the above addresses
- Go to your previously open TextEdit window and scroll to the bottom and put the cursor on the last row and create a new line by hitting enter
- Paste everything below the last entry by pressing ⌘ and V when inside the TextEdit Window on the last line.
ON Linux (Ubuntu):
- Press CTRL and C to copy the above addresses
- Go to your previously open gedit window and scroll to the bottom and put the cursor on the last row and create a new line by hitting enter
- Paste everything below the last entry by pressing CTRL and V when inside the gedit Window on the last line.
Microsoft Analytics:
- Copy the following text below to block Microsoft Analytics:
0.0.0.0 vortex.data.microsoft.com
0.0.0.0 vortex-win.data.microsoft.com
0.0.0.0 telecommand.telemetry.microsoft.com
0.0.0.0 telecommand.telemetry.microsoft.com.nsatc.net
0.0.0.0 oca.telemetry.microsoft.com
0.0.0.0 oca.telemetry.microsoft.com.nsatc.net
0.0.0.0 sqm.telemetry.microsoft.com
0.0.0.0 sqm.telemetry.microsoft.com.nsatc.net
0.0.0.0 watson.telemetry.microsoft.com
0.0.0.0 watson.telemetry.microsoft.com.nsatc.net
0.0.0.0 redir.metaservices.microsoft.com
0.0.0.0 choice.microsoft.com
0.0.0.0 choice.microsoft.com.nsatc.net
0.0.0.0 df.telemetry.microsoft.com
0.0.0.0 reports.wes.df.telemetry.microsoft.com
0.0.0.0 wes.df.telemetry.microsoft.com
0.0.0.0 services.wes.df.telemetry.microsoft.com
0.0.0.0 sqm.df.telemetry.microsoft.com
0.0.0.0 telemetry.microsoft.com
0.0.0.0 watson.ppe.telemetry.microsoft.com
0.0.0.0 telemetry.appex.bing.net
0.0.0.0 telemetry.urs.microsoft.com
0.0.0.0 telemetry.appex.bing.net:443
0.0.0.0 settings-sandbox.data.microsoft.com
0.0.0.0 vortex-sandbox.data.microsoft.com
0.0.0.0 survey.watson.microsoft.com
0.0.0.0 watson.live.com
0.0.0.0 watson.microsoft.com
0.0.0.0 statsfe2.ws.microsoft.com
0.0.0.0 corpext.msitadfs.glbdns2.microsoft.com
0.0.0.0 compatexchange.cloudapp.net
0.0.0.0 cs1.wpc.v0cdn.net
0.0.0.0 a-0001.a-msedge.net
0.0.0.0 statsfe2.update.microsoft.com.akadns.net
0.0.0.0 sls.update.microsoft.com.akadns.net
0.0.0.0 fe2.update.microsoft.com.akadns.net
0.0.0.0 65.55.108.23
0.0.0.0 65.39.117.230
0.0.0.0 23.218.212.69
0.0.0.0 134.170.30.202
0.0.0.0 137.116.81.24
0.0.0.0 diagnostics.support.microsoft.com
0.0.0.0 corp.sts.microsoft.com
0.0.0.0 statsfe1.ws.microsoft.com
0.0.0.0 pre.footprintpredict.com
0.0.0.0 204.79.197.200
0.0.0.0 23.218.212.69
0.0.0.0 i1.services.social.microsoft.com
0.0.0.0 i1.services.social.microsoft.com.nsatc.net
0.0.0.0 feedback.windows.com
0.0.0.0 feedback.microsoft-hohm.com
0.0.0.0 feedback.search.microsoft.com
|
ON Windows:
- Press CTRL and C to copy the above addresses
- Go to your previously open Notepad window and scroll to the bottom and put the cursor on the last row and create a new line by hitting enter
- Paste everything below the last entry by pressing CTRL and V when inside the Notepad Window on the last line.
ON macOS:
- Press ⌘ and C to copy the above addresses
- Go to your previously open TextEdit window and scroll to the bottom and put the cursor on the last row and create a new line by hitting enter
- Paste everything below the last entry by pressing ⌘ and V when inside the TextEdit Window on the last line.
ON Linux (Ubuntu):
- Press CTRL and C to copy the above addresses
- Go to your previously open gedit window and scroll to the bottom and put the cursor on the last row and create a new line by hitting enter
- Paste everything below the last entry by pressing CTRL and V when inside the gedit Window on the last line.
- You should now have a list of hosts you want to block with IP addresses of 0.0.0.0. Briefly look at your list and ensure that there are no spaces before or after the list. So the first character in the file should be a 0 and you should not be able to move the cursor any higher. The last character in the file should be the last letter in the last hostname and you shouldn’t be able to move the cursor any further right or down.
STEPS TO BLOCK ADWARE AND MALWARE WEBSITES ON YOUR PC - EDIT YOU SYSTEMS HOST FILE AND COMMIT CHANGES
- Now we will open the hosts file and prepare our previously generated list. As stated above, if you do not have administrator control over your PC or Mac you will not be able to accomplish this step.
- For Windows and Mac, instead of trying to write directly to the file, we will be copying the file to some area where we can work on it, and then copying it back. This avoids us having to deal with setting permissions and or ownership of the hosts file. In Linux we will simply open a window to directly edit the file. Open up a file browser and browse to the location of the hosts file and then copy it to your desktop, and then open the copied folder:
ON Windows:
- Press the Windows Key and R, type explorer and hit enter
- Navigate to the C:\ drive (under This PC or My Computer)
- Then Windows folder
- Then System32 folder
- Then drivers folder
- Then etc folder
- While holding the CTRL key drag the file named ‘hosts’ on to your desktop, this will create a copy of the file
- Open another Notepad window by pressing the Windows Key and R, then type in notepad and hit enter.
- In the new Notepad window select File > Open, change the “Text Document or *.txt” drop down to say All Types *.* then select the Desktop and select the hosts file you just copied and hit open.
ON macOS:
- Open a Finder window by double clicking on the icon below

- In the ‘Go’ menu select ‘Go to Folder’
- In the ‘Go to folder’ window type /private/etc and hit GO
- While holding the Option key drag the file named ‘hosts’ onto your desktop, this will create a copy of the file
- In TextEdit go to File Menu > Open, go to your desktop and select the hosts file and open it. It should open in a new window or tab.
ON Linux (Ubuntu):
- Open a terminal window by hitting ALT + F2 and type ‘terminal’ and select your desired file manager application
- Enter the following command into terminal entering your password if requested:
sudo gedit /etc/hosts
- The hosts file should open up in a separate window
- We now need to prepare the data to paste over:
ON Windows:
- Go to the Notepad window that has your created list of hostnames that you want to block and ensure that the formatting is consistent and there are no tab characters. You can usually visually check for tab characters by seeing if there are extra spaces that only are one character.
ON macOS:
- Go to the TextEdit window that has your created list of hostnames that you want to block and ensure that the formatting is consistent throughout.
ON Linux (Ubuntu):
- On Ubuntu you will need to make sure that all the white spaces between the IP addresses and web addresses are all tab characters.
- Click on the gedit window that has your generated list of hostnames and press CTRL and H. You will now see the Find and Replace window.
- Make sure ‘Regular Expression’ is ticked
- In the Find window type ‘0.0.0.0 ‘ make sure there is a space character after the last 0
- In the Replace window type ‘0.0.0.0\t’ You should now see something like this:

- Click Find, and then click ‘Replace All’ even if they are greyed out.
- Now we will paste the website list over.
- On all platforms you will need to go to your system hosts file in the text editor you are using and position the cursor after the last character in the file and then create a new line by hitting enter. See below for an example, you want to preserve any extra spaces that are already in the file (here you can see the cursor after the wpad entry):

- Once you have created the new line head on over to your created list of hostnames and on your platform copy it over:
ON Windows:
- In your created hostname file press CTRL and A to Select All
- Press CTRL and C to copy
- Switch over to your system host file in Notepad and press CTRL and V to Paste all your hosts to be blocked into your system host file
- Close the Notepad window that doesn’t have your system host file and select ‘Don’t Save’ when prompted to save the file
ON macOS:
- In your created hostname file press ⌘ and A to Select All
- Press ⌘ and C to copy
- Switch over to your system host file in TextEdit and press ⌘ and V to Paste all your hosts to be blocked into your system host file
- Close the TextEdit window that doesn’t have your system host file and select ‘Don’t Save’ when prompted to save the file
ON Linux (Ubuntu):
- In your created hostname file press CTRL and A to Select All
- Press CTRL and C to copy
- Switch over to your system host file in gedit and press CTRL and V to Paste all your hosts to be blocked into your system host file
- Close the gedit window that doesn’t have your system host file and select ‘Close without Saving’ when prompted to save the file
- We will now save and close your hosts file and copy it back to the system.
ON Windows:
- In Notepad select File and Save, and then close Notepad
- Drag the hosts file from your desktop to your Windows Explorer window that is open to C:\Windows\System32\drivers\etc\
- Click ‘Replace the file in the destination’
- Click ‘Continue’ to provide administrator permission to move to this folder
ON macOS:
- In TextEdit select File and Save, and then quit TextEdit
- Drag the hosts file from your desktop to your finder window that is open to /private/etc
- Click ‘Authenticate’ to provide administrator permission to move to this folder
- Click ‘Replace’ to replace the file that already exists in that location, you may be required to re-enter your password when prompted
ON Linux (Ubuntu):
- In gedit Select ‘Save’
- Close TextEdit
- Now we need to refresh the DNS Cache. If you like you can skip this step by rebooting your PC.
ON Windows:
- On your keyboard press Win and X to open the WinX Menu.
- Select Command Prompt (Admin)
- Run the following command and hit enter:
ipconfig /flushdns
- If it succeeds it will respond with:
Windows IP configuration successfully flushed the DNS Resolver Cache.
ON macOS:
- In Spotlight search (top Right of screen) type Terminal and hit enter
- Run the following command and enter your password
sudo killall -HUP mDNSResponder
- You should not see a response.
- Quit Terminal
ON Linux (Ubuntu):
- Go to your open terminal app
- Enter the following command (enter password if required)
sudo systemd-resolve --flush-caches
- Enter the next command to confirm your flush was successful
sudo systemd-resolve –statistics
- You should see ‘cache size: 0’
TESTING
- Test by opening up a website and try browsing to one of the blocked sites.
- If you see a blank page or a 404 error you are now filtering ads! Go have a tasty snack.


Comments
Post a Comment